Design & Illustration

Limma ihop

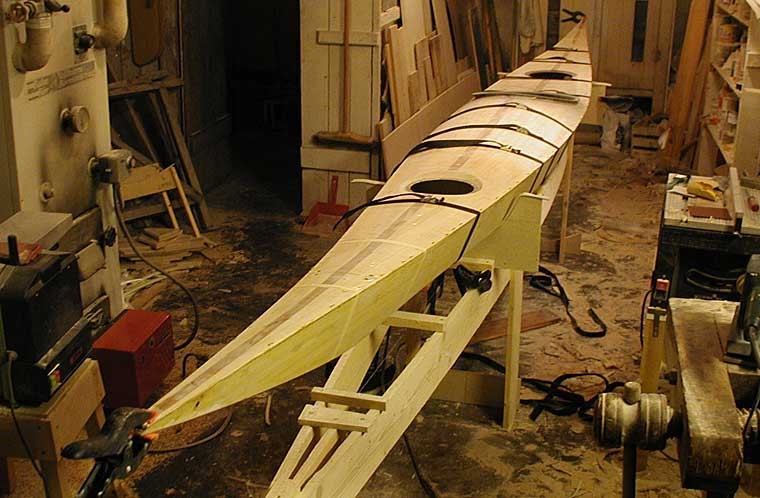
När allt förberedande är klart limmas skrov och däck ihop med epoxy blandad med slipdamm eller microfiber. När limningen härdat slipas relingskanten och förstärks med några remsor glasfiber på ut- och insidan.

Sedan återstår bara lite småpyssel: några lager lack, något att sitta på, lite däckslinor och sådant – och sedan...

| Tillbaka |

Kommentarer

How do you reinforce the sheer (= glued interface between deck and hull) with fiberglass tape inside? I can see how you would wrap a fiberglass tape around the edge from the outside, and send it down so you can't see the step after finishing, but how do you get inside once deck and hull is glued together?

When I read earlier about the deck "you know what to do, sand laminate both sides..." I was thinking just to laminate the inside, and leave the outside for the marriage between deck and hull, laminate the entire deck and the sides so that the glass fibre holds deck and hull together?

Am I making any sense? Regardless of this, I love your descriptions and greatly enjoyed reading it. I'm undecided about KAVAT or NOMAD....I'll think about it for a few days and then buy your plans.

I'm thinking of using 5mm PVC foam instead of wood, laminate the outsides with 0.5 hardwood veneer to create beautiful patterns and then laminate with glass fibre. Nobody sees the inside, so that will just be glass-laminated.

Cheers, and thanks for setting up such a great website.

Jurgen

That is covered in the building manual, but the short version is: laminate two narrow strips of fiberglass over the inside seam, where you can reach comfortably. Leave the rest. If you are unsure about the glueing, you can pour a spoonful of epoxy into the kayak and tilt the hull so the epoxy runs along the full inside seam, filling the odd gaps in the glue line.

It is a good idea in theory to laminate the outside last and in one go. However, handling the unlaminated hull when doing the inside carries a risk of cracked seams and a lot of unnecessary extra work. I prefer to have the hull stabilized with fiberglass before stressing it by sanding and laminating.

Note that with foam you lose all of woods superior longitudinal strength. Veneer adds some of that strength to the setup (provided you use long longitudinal pieces), but you will have to use slightly heavier fiberglass to match the original durability and stability. My reaction is that it is a absurdly labor intensive way to get a kayak that may be as light as the original setup (using more fiberglass at density 1,5 to save on wood at density 0,45 is not a obvious way to save weight) and maybe look prettier, provided that the veneer pattern is prettier than solid wood strakes.

Other potential problems is that you have to be extremely careful (and lucky!) to avoid depressing the foam into unfair bumps and hollows between the molds when laminating the veneer – and you have no margin to correct anything with sanding afterwards. To succeed with such a layup, you normally need a full mold; ie a stripped and faired hull on top of which the foam and veneer can be laminated – which in essence means building two hulls to get one.

But then there is Lazarus Long's Thesis: "Always listen to experts. They'll tell you what can't be done and why. Then do it."

Brilliant answers, thank you so much!

Best wishes,

Jurgen

Sir;

I would like to build a Nomad double but would like to study the construction manual first.

Can I obtain the construction manual ? If I find the construction beyond my expertise - I will

build the single Nomad - at which time I will purchase the complete set of plans.

Thank you,

Douglas Lee

Hi Douglas, the manual is available on the site: /building-manual. It covers the generic building process for my strip kayaks. Model-specific instructions are printed on the plans (dimensions, recommended cockpit configuration, hardware etc).

Note that there is very little difference in building skills needed between the different kayaks or canoes – the more complex ones of course takes a bit longer to finish, but that is all.

Er det en brugbar mulighed, når man skal lime dæk og skrog, først at lime forstærkningsremsen med halv bredde fri på dækkets inderside, lade den komme i klemme i sømmen og så lime resten fast på ydersiden af skroget? Dvs. lade den zig zagge fra inderside til yderside. Herefter lime de to yderremser ovenpå, som sædvanligt?

Man kunne så få en ordentlig forankring inderst, Men den vil selvfølgelig, ikke dække selve sømmen, men være en del af den.

Det går säkert, men jag ser ingen direkt vinst med det. En halv remsa extra osymmetriskt på in- och utsida. Det finns dessutom en risk att det blir luftfickor eftersom väven ogärna låter sig böjas tvärt runt en kant, och därmed risk att man kapar glasfibertrådarna när men slipar utsidan jämn.

En annan variant är den som Gunnar Klarfjord tipsade om här. Jag har inte själv provat, men den kan ge lite styrning så att skrov och däck passar ihop lite enklare.

Skriv en kommentar